|
The
kit was build approximately 3 years ago and has started my collection of the
WWII top fighter aces planes.
The
kit
The
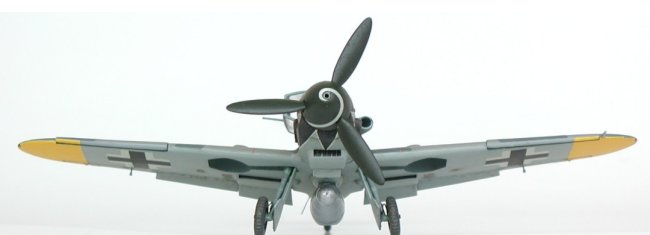
kit is from the Hasegawa production in the 1:48 scale. PE parts from Eduard we
added to the cockpit. Painted cooper wires represent brake lines and a circle
antenna behind the cockpit, a wire antenna is made from a hair.
For
me the most important criteria is how the kit looks on the shelf. So I rather
spent my time by the gathering info about the right camouflage and marking then
checking the kit dimensions, surface panel lines etc. against blue prints.
That is why I found out too late that the circle antenna should not be
there.
I have
borrowed the digital Olympus camera from my friend to make some shots of my
kits. That evening, when camera was already returned, I viewed made
pictures in my computer. Till now I saw that wire antenna was broken. Again
confirmed that hair is too sensitive to handle with little/no
care.
Assembling
I will
avoid description of the kit assembling, how parts fit etc. as it was a time
ago and I do not remember all details.
Painting
The
basic camouflage scheme was airbrushed, all details with different colors
(interior, landing gears etc. were brushed. Dark green spots, part of camoflage
scheme, were also brushed. I used Humbrol and Revell enamels, all colors
were mixed.
|
Click on images below to
see larger images |
 |
 |
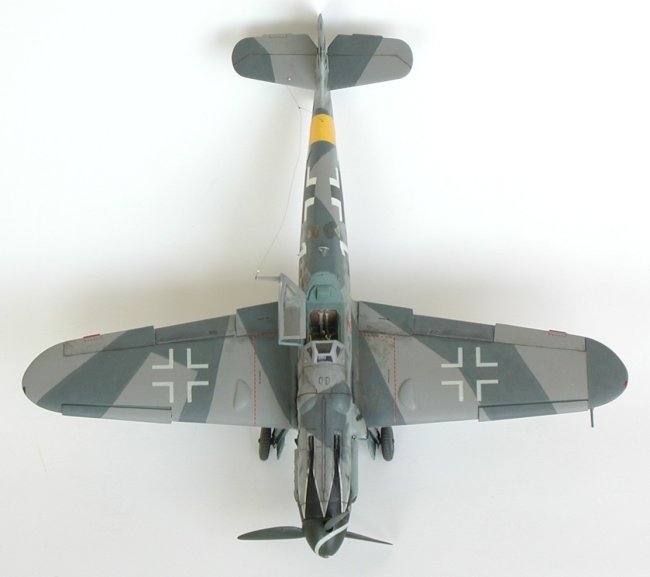
Markings
For
the standard Luftwaffe marking as crosses and stencils were used original decals
comming with kit. Black part of the fuselage cross was overpainted with dark
green. White strip on the spinner, white 1, white – and swastika were used
from my spares box. All oher parts of the Hartmann’s
personal marking were brushed: red heart with "Usch" and black tulip
leaves on the fuselage nose.
For
tulip I tried following technique. I prepared the template and then I slightly
used razor-blade to make very thin border lines of black inside and white
outline of the tulip. Then I firstly carefully hand painted white outline
with the focus to make straight the outer line. After paint was dry I hand
painted black inside of the tulip. Black color covered imperfections on the
inner side of the white line. The thinned color itself followed lines. I use
this technique when I have to hand paint usually straight patterns. I use
masking only for airbrushing. After some practising it works for me quite well.
Then
I outlined panel lines by a pencil and airbrushed mixture of matt and
semi gloss finish. After it was dry I brushed tulip, heart and the other
marking details by very thinned mixture of the finish with the different ratio
of matt and semi gloss.
Weathering
All
weathering is brushed by very thinned mixture of matt Sand, Dark Earth and Black
enamel with the required ratio. Somewhere more brown, elsewhere more black.
I like
this approach because it makes the kit surface not so homogeneous.
| Click on images below to
see larger images |
 |
 |
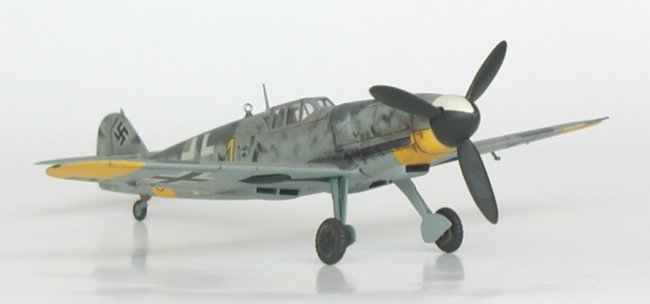
Bf-109
"Yellow 1"
The
second kit represents Bf-109
G-6 belonged to Hartmann from October 1943, the time after his 121st victory.
The
kit
The
kit is from the Hasegawa production in the 1:72 scale. Kit was built OTB without
any aftermarket parts added. Only decals that came with kit were used. The kit
was built just for pleasure, only as a basement for painting another
Hartmann camouflage.
For
painting, marking and weathering were used the same techniques as for the
previous kit.
|
Click on images below to
see larger images |
 |
 |
Taking
Photos
All
pictures were taken on the balcony during a sunny day. The kits were placed on
the A1 white paper sheet. The first shots were taken in the direct sun light,
but the kits were too dark because of the white background and my limited
abilities to use all features of the borrowed digital camera. Then I tried
to placed them into the shadow and take some pictures in the indirect light.
After short experimenting I was pleased with the results. Planes looked
quite well for me and, moreover, there were no sharp shadows of the plane on the
background.
References
I hope
you all enjoy them.
Misos
|