|
Okay first
off – This is NOT a real Predator paint scheme!
That said…
This is
Unicraft’s resin 72nd scale Predator kit.
Mike J. Idacavage included a
great description of this beast in his build article here on ARC.
Click
here
The
Predator struck my fancy and turned my head briefly away from my usual 48th
scale world of USN planes, T-bolts, and so on, back when I first heard the
rumors that a Predator strike had killed Bin Laden.
The idea that an unpiloted recon plane with Hellfires stuck on it was
prowling the skies just intrigued me. Recently,
a Predator apparently succeeded in assassinating a highly-placed
Al Queda official in Yemen. Regardless
of how one may feel about that, the aircraft is apparently effective.
My dad (He Who Got Me Into Modelling long ago) remarked, that it looked “like
something designed by an entomologist “
As good as description as any!
Starting out…
This
was my first-ever all-resin kit and I feel like it was just a click or two above
my current skillset. Sort of like
standing up on my tippy-toes of skill in order to reach this.
I will probably get a few more regular injection kits under my belt
before attempting another all-resin. Prior
to this kit I had worked with several resin sets for cockpit improvements,
control surfaces, even figures. But
an all-resin kit is a different mindset! This
kit is nicely-priced, though, and I can easily imagine myself breaking down and
building another one in the not too distant future.
Plus it just looks cool!
On Unicraft’s
website they nicely show all the included parts.
Since
this is a resin kit, absolutely everything on this kit was attached using CA
glue.
What
surprised me the most was that this kit has no alignment tools at all.
No pins and holes, no slots, no tabs.
Nuttin’. I don’t know if
this is normal for resin kits. What
also surprised me was the lack of instructions – included in the kit is an
8x10 sheet with a 3-view of the Predator assembled. This serves as your part
list and your instruction sheet. Once I got over my shock at getting to wing it
alone, this was actually very helpful. If
I were to start over, I would photocopy this sheet to keep a backup because I
used this sheet repeatedly to help align the parts and as a result my sheet now
has drips of paint and glue all over it. Luckily, and atypically for me, I managed not to drip
anything over and of the diagram sections I needed to read and line-up with!
Lessons
Learned:
Also
if I were to do this kit again, I would use pins and drilled holes for everything
that I was attaching to the kit. For
this one I used pins just for the wings – drilling 2 holes each in each wing
and in each side of the fuselage where the wings attached – be sure you
measure about 5 times to make sure you are lining them up perfectly before
drilling and certainly before dragging out the CA glue! I won’t tell you
whether I did a good job at this or not. J
I’ll take the stance of “Viewers get to decide what is art and what
ain’t.” Then, after I had
virtually everything attached to the kit and even after the main paint job, I
managed to snap off the vertical stabilizer for about the 20th time.
Finally it occurred to me that I really should have pinned and drilled
this as well, so I belatedly redid this which is a bigger pain to do with the
paint job applied then it would have been before.
Next time, I will pin and drill every single piece right from the start.
I snapped off the diagonal stabilizers a couple times each as well.
The joint using the required CA glue is just too brittle on its own
without some sort of pinning mechanism. I
used pieces of paperclip as my metal pins.
It doesn’t take much at all to snap off the non-pinned pieces. I just hope I don’t break it again… Don’t look at it too hard! If you are looking at building
this kit, I strongly recommend working out a pinning system for yourself, it
will save heartache and profanities!
Once
I worked through the stress of the assembly, this kit looked cool from the
get-go. Similarly to Mike’s kit,
I drilled a hole in the back and Elmered a toothpick into there as a safe handle
to use while working with it. Since
the attached pieces are so brittle and break off so easily, I highly recommend
this step – it will reduce the dents in your walls from banging your head!
Once you have everything else done, you can pull the toothpick out and attach
the prop/spinner last. Speaking of,
I have some concern over the prop and spinner.
Each blade was a separate piece and you need to drill the holes in the
spinner and figure out the angles of the blades. This worried me and I actually tried scrounging up a prop and
spinner from another kit… but you see, well… Jeni is the 72nd
scale modeler in the house and she rather frowned upon my plan to swipe a prop
from one of her kits… ;-)
So I used the kit set and just hope it looks ok.
You
have to come up with your own antennae to stick on the spine, as well as your
own nose antenna. Also, on most
photos of the Predators with hellfires, there weren’t the avionics humps on
the back or under the chin – so I left these off of mine.
I also noticed that each diagonal stabilizer seemed to have a little
“stick with a blob” pointing forward. So
I made these up as well using tiny scrap styrene and a couple blobs of CA glue
for the blobs. The Hellfire
missiles included in the kit aren’t very pretty, and they seem small. The ones I used were supplied by a wonderful and generous ARC
reader who’s name I can’t recall as I write this (I apologize!) though IIRC
he is the same gentleman who supplied Mike with his. Thanks again!
I think that these are available in a 72nd scale Apache kit.
I
kept a print-out of Mike’s ARC article next to the modeling table and I would
recommend doing that for anyone who builds this kit.
His article was very helpful, as were his replies to my occasional emails
begging for insight!
That
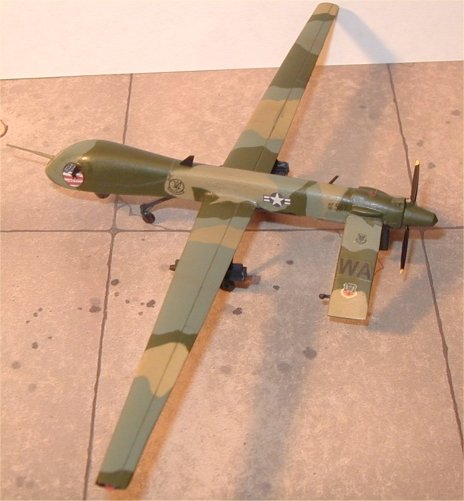
Scheme.
Okay,
now what is up with the camo? To
the best of my knowledge, there are currently no Predators in any scheme other
than allover white, or white with light grey undersides.
Believe me, I tried to discover any other paint job at all out there…
but no joy. An authentically
painted Predator would be white. White white white.
How
dull.
Aside
from the admitted fact that I just hate painting large areas of white, this
beast just looks too cool for such a dull paintjob.
I couldn’t bring myself to do it.
I considered the USN gray on gray with highlights of gray…. I
considered some sort of splinter scheme… but in the end it was the recent Fine
Scale Modeller magazine about the venerable B-52 BUFF.
Jeni and I have visited AMARC in Arizona twice in the past couple years,
and have seen the guillotine looming over dissected BUFFs.
Very very sad, even though we know it represents peace they helped to
earn. I like BUFFs a lot. And in
the FSM spread with profiles of different BUFF schemes was the SEA scheme.
Too cool. I scanned the
3-view sheet provided with the kit and used a photo-editing program to
test-paint this scheme on the Predator and decided it would look just as awesome
on the Predator as it did on the BUFF, albeit on a smaller canvas!
So
that scheme is a sort of tribute to the BUFF as well as just a cry for help –
Please USAF and CIA… Look at how cool that looks on the Predator!
Change the white scheme to something cool like this! It’d be perfect
for roaming around! Anyone know the
leaders of the Predator program? Send
‘em to ARC, please!
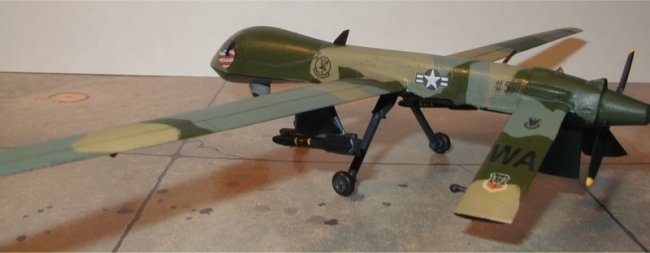
Decals
and Markings
I
used the kit decals and they are the thickest decals I have ever used.
Ever. In fact, when these
photos were taken the decals are visibly thick – above the paint.
I am strongly considering re-spraying the thing with a few coats of
Future to try to level this out and make them look better.
If I do this kit again, I will make my own decals and use those instead.
The tail-number is made-up, since I didn’t want to get snagged by
representing an actual vehicle, since that would surely be a WHITE critter.
I hope I chose a 3-digit high enough to not include any current ones.
Let’s
Roll.
The marking on the nose on the left side is the emblem that many of our
US aircraft are wearing these days. Jeni
and I have seen this marking on planes ranging from an F-117 to a Viking to a
BUFF to a KC-135. Especially
considering the current mission of many Predators, it seemed appropriate to me
to let a Predator wear this as well. I
made this decal myself with our ALPS MD1000 (including the white) and this was
the first time that decals I made myself were better than the kit ones.
Overall
I
am happy with this kit. I suspect I
will be happier once I get the visible thickness of the markings to go away!
It is bigger than you might expect – the wingspan is 8.1 inches. (20.57
centimeters) so I doubt that I would want to build it in a bigger scale.
In 72nd it is pretty manageable and fits in the display case.
I really like how a camo scheme looks on it and am actually sorry that I
didn’t try this scheme on one of the evil JSFs!
It sure looks different in the display case than any other kit we have in
there. I hope that the Forces In
Question decide to give the Predator in real life a more interesting scheme too!
I would build this kit again, with the changes I mentioned above.
It may not win anything and y’all may be able to spot all sorts of
mistakes. I learned a lot building
it, I enjoyed the experience, it was pretty inexpensive, I’m happy with the
result, and it looks damn cool. What
else could anyone ask for from a scale model!
Jeni
has the Unicraft X-47 Pegasus and she may be building that one soon.
Now
step away from the computer and go sand something!
Tracy
|