|
|||||||||||||||||||||
|
|
|
|||||||||||||||||||||
|
|
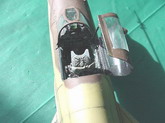
On the MIG...believe it or not, I used the Aires MIG21 cockpit. The Russians in the 60's seemed to have a penchant for wrapping bigger and bigger aircraft around the same cockpit. Minor radar screen changes and 'voila!' A MIG25. The pit fits in there like a glove. Unfortunately, its about the only thing that DOES fit right on the kit. I used what I've learned from your cockpits for the front coaming. I did it with magi-sculpt shaped it and then simply pressed in the HUD and conduit wires and knick-knack stuff before it dried. Also, I pressed the pattern in with a photo etch plating from ABER.
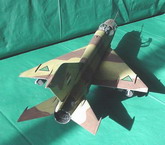
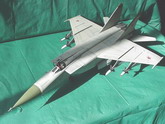
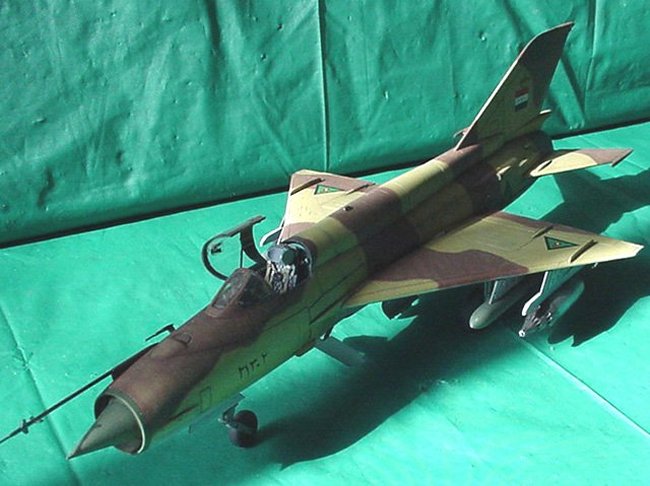
The missiles were all scratchbuilt from plastruct rods, sanded to shape. Fins were cut from .10 sheet. The infra red seeker started as a hole drilled out of the front, a small red MB lens was placed inside, Two-part epoxy was put in to overflowing and the whole thing was stood straight up to dry. Burners started as .10 sheet, placed in hot water and then wrapped around the right size dowel for shape until it cooled off. Then, a strip was glued to connect the whole thing. Once dried, I sanded the strip to match the burner shape and started gluing plastic strips that had been riveted with a pounce wheel onto the shape to create feathers. I did this on the outside AND inside to replicate the photos.
As for the Gear and gear doors, I sanded the doors thin and then built detail the standard way, with strip and copper wire. The Gear was dressed up with wire as well. I placed a firewall inside the fuselage and painted it black. Then, I placed to compressor blades in to align with the intakes. The blades came from spare 32nd scale F-4 parts for the flame holders in the back, I used the tubes and holders from a Hasegawa 1/48th scale F-14. That's about all I can think of. The kit was painted with Gunze 315...in varying shades. The Dielectric panels and radome were Tamiya Field Grey. Steven St. James
|
|
Photos and text © by Steven St. James