|
Hi everyone!
Here's some pictures
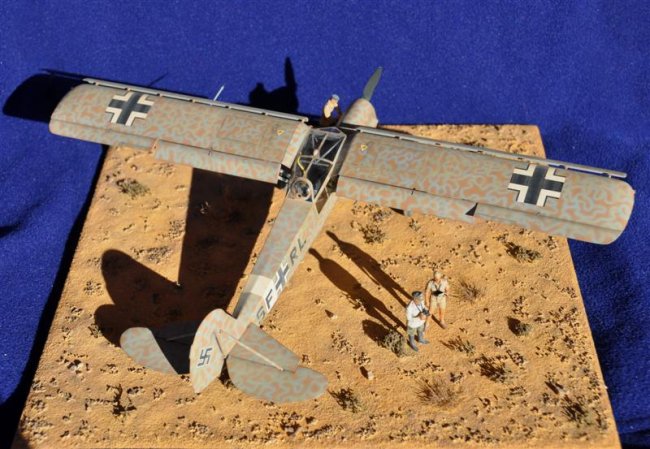
of my recently finished Fi156 C-3 trop "Storch", representing a ship
of the 1st Desert Rescue Squadron in North Africa, 1942.
I built the kit out
of the box with only scratchbuilt details added to the engine and cockpit.
Being Tamiya's 100th
release, this kit is packed with goodies like a small p.e. fret for the cockpit,
metal landing gear strut and main wing spar, canopy masks, 5 marking options,
six figures and a full set of gear (fuel drums, jerry cans, etc.) for diorama
displays... plus the usual Tamiya quality in spades.
However, if only to
demonstrate once again that the perfect kit doesn't exist, Tamiya managed to
goof the horizontal stabilizers: the profile of the part that mates with the
fuselage is wrong and it leaves a noticeable gap if not properly addressed with
thin plastic card, putty and sandpaper.
Apart from this
minor flaw, the kit builds like a dream with very few putty needed and only some
extra care must be taken for not breaking the many delicate parts (e.g. landing
gear structure) while handling the model in the various stages of the
construction.
Click on
images below to see larger images
When time came to
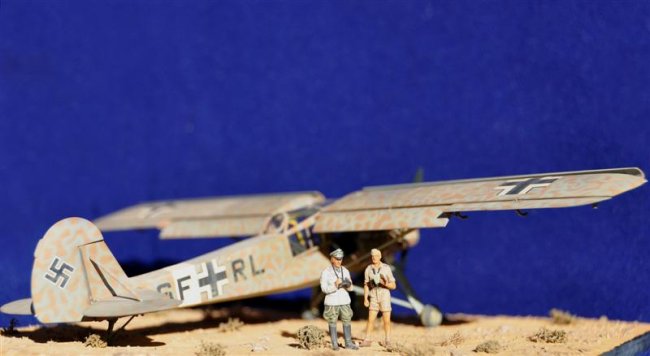
choose among the five paint schemes offered, SF+RL won hands down.
Though, the thought of having to paint those tight squiggles haunted my dreams
for some time!
So I began to search the Net for some reference and, I admit, especially for a
easy shortcut to paint those "arabesken" possibly without ruining the
model.
Incidentally, I
found out that there is some controversy about this paint scheme: some says that
light blue squiggles over sand as proposed in the instruction sheet is outright
wrong and that a standard RLM 70/71 splinter scheme with sand-coloured squiggles
would be the correct one.
Here's the link to a
forum thread about the construction of this very model along with Rommel's
"Greif" halftrack in a diorama by a very talented French modeler, it's
a very interesting and inspiring read: http://armorama.com/modules.php?op=modload&name=SquawkBox&file=index&req=viewtopic&topic_id=113518&ord=&page=1
After some
pondering, I decided to go with the "light blue vermicellis over sand"
scheme. I find it really appealing and "elegant" and actually I reckon
that this scheme could have been pretty effective in disrupting and blending the
a/c silouhette in the haze and glare of North Africa desert.
Anyway, as that
French modeler wisely said: "I will do as per instructions and blame Tamiya
if it's wrong!"
I decided at this
point not to assemble the wings, rudder and horizontal stabilizers to the
fuselage and paint them separately, in order to spray the camouflage as easily
as possible.
I began with a dark
brown pre-shading of the underside and then painted it Gunze RLM65. After having
masked the underside, I sprayed the sand color Gunze RLM79.
I didn't pre-shade
the sand colored parts as this effect would have been totally lost under the
RLM65 camo.
Here came the hard part: how to paint those squiggles?
I did many tests on
scrap models trying out any technique and shortcut I could think of: masks,
reverse mottling, brush painting...but the results were always negative.
I came to the
conclusion that I had to spray that camouflage the hard way: freehand.
The first attempts were not very encouraging, though. I found it very hard to
control the airbrush and trying at the same time to recreate the layout of the
vermicellis. They came out too broad, with too much overspray and unrealistic.
In a word, ugly.
Then I saw the light.
What I really needed
was a way to trace the camouflage pattern on the a/c surface and then follow
that pattern as neatly as possible with the airbrush.
I tested every
pencil and pastel I could put my hands on but none of them was suitable until I
found my salvation...in my wife's make-up kit, in the form of a soft white
pencil used to trace the contour of fingernail tips in the so-called
"French manicure".
This pencil leaves a thin yet noticeable line that can be erased completely in
case of mistake with a spit moistened fingertip and it's totally covered by the
airbrushed line without any bleed through.
So I traced the camo
pattern onto the model, correcting the goofs with the moistened fingertip and
then I carefully followed the pattern with the airbrush loaded with very thinned
paint and spraying at low pressure, working very close to the model and keeping
the flow as perpendicular to the surface as possible to minimize overspray.
Many touch ups with
sand color were necessary, especially in the areas under the cockpit were the
gear strut frame was in the way, but I must say that the mostly flat surfaces of
the model helped me a lot and in the end I got a good result with less effort
(and curses) than expected.
The rest of the
painting process was pretty straightforward.
I masked off and sprayed the white fuselage band and, just to play it safe, I
masked off and lightly sprayed in white the areas where the balkankreutz decals
would sit to prevent any bleed through of the camouflage.
Then I assembled the various parts, retouching the paintjob in the small areas
near the joints. I coated the model with floor wax and applied the box decals
without any trouble.
Other coats of floor
wax sealed everything, preparing the model for weathering.
First I applied a wash with oils to highlight the crisp surface details, then I
post-shaded the control surfaces, the panel lines and the areas where dirt and
grime would build up to get a realistic effect.
Both as protective
finish and as part of the weathering process, I sprayed various coats of Gunze
Flat Clear tinted with different shades of sand colors (Tamiya Desert Yellow
XF-59, Buff XF-57 and Deck Tan XF-55) to represent the faded and dusty look of
an aircraft operating in a desert environment.
As the box comes with nicely molded figures and a wealth of extra gear, I thought from the beginning to prepare a small diorama.
To try something different, as base I used a ceramic tile with a rather coarse and uneven surface that would have been perfect to simulate a small corner of that hard floored North African desert often seen in pictures.
First I brushed the tile with a 50%50 mix of white glue and water, then I sprinkled over it some genuine Egyptian sand with the help of a small sieve to give the base the right hue.
When dry, I brushed the base with a highly thinned wash of Flat Earth to give it some depth followed by many other washes with sand tones (both enamels and acryls) until I was satisfied with the result.
I scattered some small pebbles and coarse sand to simulate rocks and added some dried lichen and small tufts of Posidonia algae to represent the meager vegetation.
The base was then heavily airbrushed from a distance with Gunze Flat Clear and other sand tones to dust up everything real good.
Lastly, I placed four self-adhesive felt pads under the base corners to avoid damaging my display cabinet (or any other delicate surface).
I slightly modified the officer figure transforming it into the pilot while is giving a quick once-over to the engine, while the Desert Fox is being briefed on the situation in this remote sector of the front.
Thanks to Steve Bamford for maintaining this great site and special thanks go to my wife who made this build possible with the kind donation of her magical white pencil, which is now obviously part of my bag of tricks...
All the best,
Lorenzo Cassinadri
Click on
images below to see larger images
|