|
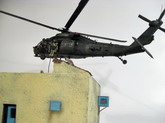
This build was my first diorama. It depicts an MH-60K Blackhawk fast roping troops onto a building. You may have seen it if you went to the IPMS/USA Nationals 2010 in
Pheonix, AZ.
This project took me roughly two and a half years to complete. I 'staged' the diorama into three main parts. The first was the building, the second was the helicopter and the third was the figures, although I did work on all 3 simultaneously. The kit itself was heavily modified. The final count for pieces that I used unmodified was 10. For the most part, the modifications were scratch built, and some photoetch was added from Eduard's UH-60 set and SH-60 set.
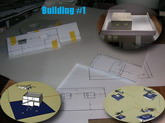
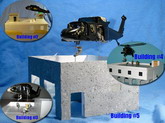
The first of the main parts was the buildings. I started out by sketching my ideas in Google Sketch-Up. I revamped the building before I constructed the original house. I drew it out on paper based off of measurements I took in Sketch-Up. I then made copies and used those copies to cut out the building. As you can see
in the pictures below, I went through 5 buildings. Two were built out of cellfoam, two out of sheet styrene, and one was a kit (Italeri's Berlin House). I ended up using the garage/storage facility that I built out of styrene. The stucco was done with Mr. Surfacer. I used an HO scale door for the side door and placed mesh from a pyramidal tea bag over it to reduce visibility into the empty interior.
Click on
images below to see larger images
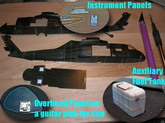
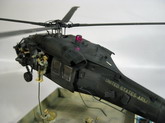
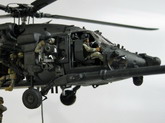
As for the helicopter, I started off by scratch building the instrument panel and center console. I replaced the pedals with PE parts, built the collectives and the overhead panel. I also
built the pilot's armor, the heaters and a few other details around the cockpit. Then in the cabin, I scratch built the avionic cabinets behind the pilot seats and the ammo cans were modified from 40mm grenade ammo cans that I then cast in resin. I also scratch built the auxiliary fuel tank from styrene, copper wire, tape, and some left over PE. I also scratched the new roof for the interior that integrates with the fast ropes in order to balance the helicopter. Originally, I had a thicker wire that I was going to use for the fast ropes, but it was pointed out to me on one of the forums that I posted this too that it was out of scale, so I tested thinner wires until I got to the correct size.
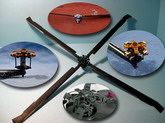
As far as the exterior modifications go, I sanded down all the panel lines, scribed them, and riveted the outside. The rivets weren't that deep, so they are hard to see in the pictures, however, at 1/72, they probably should be pretty hard to notice anyways. I added a lot of details using wire, tubing, styrene and PE to do just about everything. The main rotor has 60-some parts on it alone. The miniguns are modified from the HobbyBoss HH-60H kit. I drilled out the flash suppressor and the empties chute, and made the ammo chute out of two bent PE .50 caliber belts. The chaff/flare buckets came from the MH-47E PE set, and the FLIR was modified from the Revell AG kit MH-47E kit and then cast.
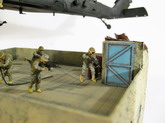
The guys in back were mostly sculpted using procreate (the grey putty) or green stuff (the green putty). I used a few hands from a Navy Deck Crew set and the legs on two of the figures were modified from the Hasegawa USAF ground crew set. The M240 is PE from OKB Grigorov and the M4's are modified M16's from Goffy that I cast. The slings are from Tamiya tape. The gunners are modified Modern Hobbies helicopter pilots while the pilots are modified Hasegawa pilots with modified Prieser Heads. The figures were all painted using Vallejo acrylics.
The helicopter was painted with Tamiya & Gunze Acrylics. I used NATO Black as a base, but mixed colors to achieve the paint fading. I also used Vallejo acrylics to slightly change the fading, especially on the upper surfaces and the sliding doors. The decals were a mix of Cobra Company & Fireball
Modelworks. I faded some of the decals using thinned NATO Black. I also used Flat Black under some of the decals as to give them a 'freshly applied' stencil look. I put on some of the final touches, including the gold mylar on the laser detectors and pink vision blocks, intended for a 1/35th M-113, cut to size, attached to the ALQ-144 'disco ball'. Lastly I glued the figures to the base and the helicopter, but I didn't glue the helicopter onto the building. The helicopter balances onto the base, and can be removed for ease of transport.
I was extremely happy to call it done. It was pretty neat meeting the people who watched it be built online at
NATS. Overall, it was entertaining to build and get feedback on because it is an uncommon subject. Thanks to all for the support, motivation, help and critiques during the build.
Feel free to drop me an email if you have any questions.
Austin Kennedy
Click on
images below to see larger images
|
|