|
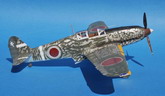
This is my Hasegawa 1/32 Ki-61-I Otsu that I built a couple of years ago in the colors of the 78th Sentai at Boram Airfield, Wewak, New Guinea in Oct. 1943.
This kit was a real pleasure to build, the fit and detail of the parts was very good. I added some details and wiring in the cockpit, scratchbuilt the seat harness, the brake lines on the landing gear and replaced the wing guns and pitot tube with hypodermic needles.
I wanted to build a natural metal "Tony" with the kitchen foil technique and the colorful boxart scheme seemed to perfectly fit the bill. Though, while I was collecting some reference pictures from the Net, I stumbled upon the dramatic photo of a raid on Boram Airfield taken at treetop level by a marauding B-25. I was totally
fascinated by that picture, that I told myself I had to reproduce the livery of THAT hapless "Tony" awaiting his fate in a hail of .50 cal gunfire!
I couldn't find any other picture of that a/c, but I found a profile on a decal sheet which helped me a lot with the layout of the tactical markings. I used as reference other pictures of Ki-61s from other units operating in Papua/New Guinea in the same period.
|
Click on
images below to see larger images
|
|
|
I foiled almost every part of the model except some difficult spots like the supercharger intake and the wing root's trailing edge where I couldn't manage to conform the kitchen foil smoothly. These parts were sprayed with Alclad Aluminum lacquer. Ailerons and horizontal tailplanes were painted Gunze JA Gray as they were covered in doped fabric. Next I masked off and sprayed the anti-glare panel, the yellow ID bands and hinomarus and applied the only decals (Kanji "NO STEP" on the wings). Then I sprayed freehand the camouflage with heavily thinned Gunze JA Green. To simulate the extensive wear and tear of the field applied camo, I began to carefully sand the model with a slightly wet fine grit sanding cloth, concentrating on the areas where the aircrews would be working the most like the cockpit, the engine and on the wings around the fuel and guns access panels. Then I masked off and airbrushed the white ID bands on the fuselage and tailplanes and wrote the Kanji symbol on the rudder with a white marker. Also I masked off and sprayed the number "19" on the landing gear doors and outlined it freehand with a fine tip red marker. After that, I delicately chipped the paint on the factory painted areas (hinomarus, anti-glare panel and wings ID bands) using the tip of a X-Acto blade or gently tapping and scratching some spots with the knurled grip of the X-Acto handle.
Now, let me spend some words about foiling. I'm sure some of you may be kind of skeptical hearing about a foiled model that can be masked off, sanded and scuffed without ruining or lifting off the kitchen foil but, with due care, it can be done. I'd encourage everyone to begin experimenting with this technique. True, in the beginning it can be frustrating and sure it's more time consuming than airbrushing a NMF but once you get the hang of it, it gets easier and in the end it will give you the most realistic and toughest natural metal finish of all. Don't be scared by the awkward spots where the kitchen foil won't conform no matter what you do. My approach in those cases is...CHEAT! Use Alclads or your NMF color of choice on those spots, it will save you lots of cursing and it will give you even more subtle variations to the finish. Give the kitchen foil a try, I'm sure you won't be disappointed.

Back to the weathering process. After having sanded, chipped and scuffed the paintjob, I handbrushed a coat of Future (Pledge) and I let it cure for a couple of days to prepare the model for a pinpoint wash with oils on the panel lines followed by a light postshading. Then I applied exhausts and guns stains plus assorted streaks of grime and fluids leaks using a very thinned mix of Humbrol Dullcote / oils and Tamiya Weathering Sets A and B. A final coat of decanted Valleyo Acrylic Matte Varnish wrapped up the job. I airbrushed a general light coat of Matte Varnish to seal the model and to tone down the sheen of the Pledge coat, while I insisted on areas rarely reached by the maintenance teams (like the outer part of the wings) to give those parts a dull, almost chalky appearance.
I had a great time building this kit and I think the long hours spent foiling this bird were well worth the hassle.
If you have any question or comment, please let me know.
Thanks for looking.
Lorenzo
Cassinadri
|
Click on
images below to see larger images
|
|
|
|