1/72 Tamiya F-16C block 40 "Barak 2"

Gallery Article by Yoav Efrati on May 12 2016

Israel Independence Day


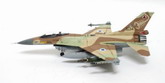
Turning Tamiya's F-16CJ into an Israeli Air Force block 40 F-16C "Barak 2"
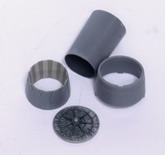
Producer: Tamiya
Subject: F-16CJ Block 50 Fighting Falcon 
Scale: 1:72
Stock Code: Tamiya Kit No. 60786 

Paints Used: 
Humbrol: 2 Emerald, 11 Silver, 67 Tank Grey, 117 FS34102, 121 Pale Stone FS33531, 126 FS36270,140 Dark Gull Grey FS36231, 155 Olive Drab,163 Dark Green BS641, 85 Satin Coal Black, 30 Deep Red.
Tamiya: X-2 Gloss White
Testors Model Masters: RAF Sky "Type S" ANA610 - 2049, FS30219 Tan 1742, FS33531 Sand 1706, FS36375 Light Ghost Grey 1728.

Weathering Agents: 
Example: 
Winsor & Newton’s Raw Umber
Winsor & Newton’s Payne’s Grey 
Humbrol Weathering Pigments Dark Earth 

Additional Materials:
Detail Associates flat brass bar #2524 (.010" X .030").
Evergreen Plastic Strips # 157 (1.5mm X 4mm),
Evergreen Plastic Strips # 158 (1.5mm X 4.8mm)
True Details Aces II Ejection Seat - TD72406
Hasegawa Aircraft Weapons: VI (US Smart Bombs Set) - HE35011

Recommended Reference: 
F-16C/D 'Barak' in IAF Service - Author: Ra'anan Weiss 
ISBN: 978-965-7220-18-4, Publication #8 of our popular series 'Aircraft in Detail'.
Cat. Number: IAFB-21

Tamiya's new tooled 1:72 scale block 50 F-16CJ encourages the modeller to think outside the box. The kit's lack of wing pylons, fuel tanks and type 16S210 wing tip sidewinder launch rails, fitted to previous block Fighting Falcons versions, require that the builder look outside the kit box for these items. Without a doubt, Tamiya's latest 1/72 scale release is the most accurate shaped and delicately detailed kit of the F-16 made to date in this scale. The kit represents the latest version of the single seat F-16, with block 50 features that include a General Electric F110 engine nozzle, wide intake, wing leading edge slat "beer can" sensors, wide main wheels, heavy type main gear, bulged main gear doors, optional IFF blades ahead of the windshield, nose gear taxi lights and LAU-129 (AIM-120/AIM-9) wing tip missile rails. 
While rummaging through my Falcon spares box for the needed fuel tanks and pylons I needed, I also found the extended vertical fin root extension I needed to turn my Fighting Falcon into an Israeli Lightning, which translates to "Barak" in Hebrew. The kit's wide intake limits its use to Israeli Air Force block 40 version called the "Barak 2". Additional changes required to the kit parts include replacement of the tear drop RWR forward nose sensors with wider scratch built sensors; attaching the intake position light atop scratch built RWR sensors; adding a bulbous sensor underneath the intake; adding scratch built ECM sensors to the back of a vertical fin extended fairing; and for pre-2004 "Barak 2" airframes adding four bulged rectangular sensors atop the engine fairing ahead of the nozzle and adding a scratch built JFS intake just aft the left main landing gear bay. "Barak 2 airframes" of this configuration were used by the First Fighter squadron and the Scorpion squadron between 1991 and 2005. For my subject, I chose a 1998 vintage, IAF 50th anniversary "Barak 2" number 534 of the Scorpion squadron, in an air to ground laser bomber configuration.

Click on images below to see larger images

Barak Bash
The first step in back dating this kit into a Barak 2, was careful removal of the wing tip integrally molded LAU-129 missile rails. Removal of the kit's wing tip rails required delicate surgery with a fine tooth saw. Attachment of replacement wing tip rails was deferred to final assembly, after all painting and decal application was complete. 

Sidewinder wing tip 16S210 rails, parachute pack vertical fin root extended fairing, pylons and fuel tanks were salvaged parts left over from a prior Revell F-16A build.  Left over Revell Belgian F-16 wing pylons with wide ended chaff dispensers were sanded down in thickness and scribed to match standard F-16C pylons. Pins were added to the pylons to match holes drilled into the bottom of the wings and brass pins added to Mk.83 laser guided bombs. 

Revell's extended fin root fairing diagonal joint line matches that of the Tamiya kit, so all that is required is to fill a gap atop the fairing once it's attached to the Tamiya fin base with super glue filler. With a file remove the small intake atop the base leading edge and remove the vent on the right side of the fin base; these items are not found on the IAF F-16C Barak. For the revised Tamiya fin to fit the fuselage slot, the risers on each side of the vertical fin tang need to be removed. 

The radome's plastic angle of attack probes were replaced with 0.33mm metal piano wire. The same wire was inserted into 0.7mm metal tubing to form the nose pitot. These were cemented into the radome, along with lead weight, using cyanoacrylate glue. 

The forward nose avionics doors A13 and A14 tear drop ECM sensors were trimmed off and wider sensors furnished from Evergreen #242 (8mm) half round rod were cemented in their place.

To avoid damage to the main landing gear during the painting and decaling stage, I removed the forward tang provided in part A18. Removal of the tang enabled me to install the pre painted main landing gear after decal application was completed.

By trimming the intake vertical separator leading edge halves, where the socket and pin of parts H8 and H11 are located, I was able to reveal the slot where the intake separator blade, part A29 was to be installed. I spray painted the intake duct Tamiya X-2 Gloss White, diluted with lacquer thinner, and installed a flat brass rod painted Humbrol 56 dark aluminum in its place. 

A HARM acquisition pod, found in a Hasegawa F-16CJ, was sanded smooth and cemented to the right side of the intake to represent a laser acquisition pod.

The kit's exhaust duct, part A28, lacks a turbine face. The forward end of exhaust duct A28 was sawn off and turbine blades were fitted from a Hasegawa F-16. To the engine's aft fairing ring part H7, four antennas were added, scratch built using Evergreen rod #157. 

The kit's rudimentary seat was replaced with a True Details resin ejection seat with molded on seat belts. The seat was attached after the rib detail was removed from seta back part C6.  
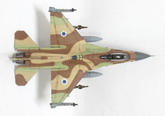
The kit's canopy F1 and rear wind shield F2 raised mold line is very slight but still requires removal with a fine sanding sponge and polishing prior to painting. With canopy closed, I left off hinge H3 shown in the instructions.

Barak Painting
The recessed panel lines inside the intake aided in masking the intake's white trucking and spraying the intake lip along with the lower fuselage FS36375 Light Ghost Grey. The radome followed with a spray application of Humbrol 140 FS36231 along with the nose wheel hub and sidewinder rails. The dark grey band ahead of the engine nozzle was painted Humbrol 32 dark grey.

The upper fuselage was sprayed Testors Model Master FS33531 sand, onto which a soft pencil was used to apply the camouflage demarcation lines. Testors Model Masters Sky Type S was used for the Barak's FS34424 green color, followed by Testors Model Masters FS30219 Tan for the brown areas. Touch up brush painting was required in some places and in some areas paint over spray was erased off using a pencil eraser. 

The engine nozzles were painted separately, painting the turbine blades Xtracolor X508 Burnt Iron with X159 F-15 Metallic Blue-Green flame arrestor. The ceramic coating applied to the interior of the nozzle leaves was painted with darkened and lightened shades of Humbrol X121 sand. The outer surface of the nozzle blades were sprayed Xtracolor X508 Burnt Iron, and sealed with a brush layer of acrylic Future Klear. I like part H6 exhaust petals external detail, the external leave rub area is recessed, this is easily painted with a dark grey wash.

Decal Application and final assembly
For the Scorpion squadron markings, I used IsraDecal sheet which provides all the markings and stencils required for this aircraft. Decal application was made with Future Klear brush painted below and above each decal. The sand used in the decal does not match that of the paint applied, this was corrected by carful brush painting the sand areas of the decal. The Future Klear acrylic clear over the decal sheet makes it easy to correct paint errors using a wooden tooth pick. With the model still gloss with Future, pre-painted, decaled and weathered pylons, fuel tanks, Sidewiders and LGBs were added. True Details ejection seat, HUD and green reflective lens were added to the cockpit and the clear canopy was cemented in place using two part clear epoxy cement. Tamiya X21 flat base was mixed with Future Klear and applied to the entire aircraft, thus giving it a matt finish. 

Reflective lenses were used for the laser designator and upper aft fuselage lights, affixed with clear two part epoxy glue. Position and strobe lights were the last items to be painted, using Humbrol colors; 11 silver for the aft tail light and vertical fin strobe light, 30 dark red for left wing tip and intake light and 221 blue for the right wing tip and intake light.

Yoav Efrati

Click on images below to see larger images

The radome's plastic AOA probes were replaced with 0.33 mm diameter metal rod, along with the forward pitot probe where it was inserted into a 0.7mm metal tube, which was imbedded into the radome with super glue filler. By trimming the forward joint of intake halves H8 and H11 locating pin and socket, I was able to attach an intake separator blade made of Detail Associated flat brass bar #2524 (.010"X.030"), after the interior of the intake was sprayed gloss white.
Vertical fin base, aft fairing extension was salvaged from a Revell F-16A kit, with ECM gizmos scratch built to match photos.

Israeli F-16C/D Barak airframes are fitted with 16S210 wing tip missile rails, requiring careful removal of the kit's integrally molded LAU-129 rails with a fine tooth saw. The forward nose avionics access doors A13 and A14 tear drop RWR bulges were replaced with wider sensors scratch built from Evergreen #242 (2.0mm) half round rod. Evergreen strip #158 4.5mm wide and 8.5mm long was used to scratch build the RWR intake fairings onto which the kit's clear position lights were attached.
The kit's exhaust nozzle detail was enhanced with sheet plastic strips and turbine blades taken from a Hasegawa kit. Left side lower fuselage APU intake was scratch built from plastic rod as well as the right intake laser designator taken from a Hasegawa F-16.


Photos and text © by Yoav Efrati