|
1. Components
2. Fuselage: Initial preparation
The kit comes with a cabin floor, and flight deck, with the struts behind the seats, but otherwise no internal detail. Fortunately, several photos of the mockup, a fuselage structure, and a wrecked preproduction example survive, which give an excellent view of the construction. This followed the typical German plan of fabric and metal frames over a primary structure of metal tube. The spars pass through the cabin, and are visible from the interior. First, the ejector marks on the inner fuselage walls were filled, along with the embrasures for the window panels, taking care to keep the windows proper clear.
The layout of the interior structure was sketched in plan, underplan, and port and starboard side views, then each individual piece was cut from plastic rod and glued into the inside of the fuselage. The control run running along the The spars were made from pieces of scrap balsa cut to shape. Lightening holes were drilled into another cross member. The structure of the cabin roof was attached to the starboard fuselage half, and carefully checked for fit. Once the interior structure was complete, the fairings walling off the main gear legs were cut from halves of plastic tube.
There is a nicely moulded twin-panel separate cargo ramp. I trimmed off one of the mounting lugs from each panel, so that it could be installed after the fuselage was bonded together. The cabin side doors are moulded in one piece with the fuselage, however. As I was just fitting a plain floor, without any seats or other furniture, this didn't pose too much of a problem.
3. Interior
The kit includes the basic cabin floor, which is probably appropriate for the service test airframe represented. Photos of the mockup do show seats, but these may not be entirely representative of the final design - some of the structural details of the mockup are different to those of the final design, so care is necessary. I painted it a dark brown, washed with brown and black ink, so as to represent unpainted wood.
The bulk interior was painted in RLM02, and then shaded with a wash of black ink. The aft fuselage interior was left until the fuselage halves were mated, however.
4. Flight deck
The flight deck interior was painted in RLM66, as were the seats, the Eduard seat belts, from one of their generic Luftwaffe sets, being picked out in white. The instrument panel was painted in RLM66, and the kit decal then applied. The delicate swingover control column, including an exposed section of chain linkage. and rudder pedals, were included on the sprue of fine injection-moulded parts unique to Huma's later releases, and were fitted in a perfectly straightforward manner.
The flight deck glazing comes in three parts, the overhead canopy and separate port and starboard crew doors. I made the grab handles for the doorframe interiors from fuse wire before noticing that they were on the fine fret too! Still, they fitted perfectly well. A small projection on the central windscreen frame was added from plastic rod. The interior frames were painted in RLM66 after the pieces were dipped in Humbrol Clear.
|
Click on
images below to see larger images
|
|
|
5. Fuselage Sealing
The window panels were dipped in Clear before the individual panes were cut from the panels and fitted into the fuselage window apertures. The port flight deck door was glued into place with Clearfix, and the starboard temporarily attached with PVA.
Once the interior face of the joint between the two fuselage halves above the ramp was made good, the area was painted in the same manner as the rest of the interior, and the two halves of the ramp glued temporarily closed with PVA. At this point the dorsal escape hatch, a separate piece, was glued into place. Curious that Huma had made the escape hatch a separate piece, but not the cabin doors. The fit wasn't entirely perfect, and required some manoeuvring around the internals, but eventually I got it plane with the dorsal fuselage.
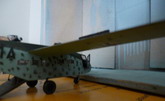
6. Wings
The wing comes conventionally divided into port and starboard upper and lower halves. The upper halves include the cavities for the airbrakes, and these were painted in the same manner as the interior. The fine sprue includes four delicate external flap actuators, which were attached to the upper surface. Assembly was perfectly fine, with little filler being needed, and then only at the root, apart from damage to the port trailing edge due to slightly overenthusiastic use of polystyrene cement.
The separate airbrakes feature internal framing, and this was picked out to advantage by the black/brown wash over a RLM02 base. They were set to one side, to be held in place by Blutack during the main painting.
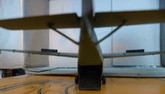
7. Undercarriage
The two main gear legs fit into two sockets beneath the fuselage, and repeated test fittings were carried out to ensure an adequate, but tight fit. The mouldings are perfectly sharp, and used as was, with the sole addition of brake cable from fuse wire.
The nose gear wheel is enclosed in a fairing, and thus the assembly was left until the main painting was completed, the two halves being left on the sprue.
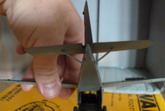
The three wheels were flattened with a steam iron, and painted, the hubs being black and the tyres Xtracolour Tyre Black. The main gear legs were painted in RLM02, and washed with a mixture of brown and black ink, the oleos being picked out in silver.
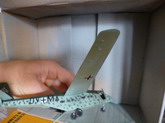
8. Empennage
The kit tailplanes are monolithic, and fit perfectly. The large rudder is moulded separately, and was attached at a slight angle for added realism. The fit is perfectly adequate, although I fear that the tailplane might have been a little skew.
9. Final assemblies
Being an unpowered glider, of basic configuration, there were few additional parts to be added. Four very nicely moulded mass balances were included in the fine sprue, as was the fin-mounted pitot tube. These were glued into place without incident.

10. Painting
I sprayed the model with cleaner prior to painting. Unfortunately, I made the mistake of not masking off the glazing first, and the clarity of the dorsal panels was adversely affected. Removing the Clear with ammonia and reapplying it helped, but did not solve, the problem. Micro Mask was used to mask off the glazing, as it does not interfere with Clear in the way that Maskol does.
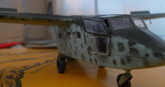
The kit's extensive colour plan gives the details for a single preproduction example, the same one as was to be found lying wrecked at the end of the war. There was presumably a deal of supposition in the exact colours used, but it is not really possible to be definitive with such imprecise references. After priming with acrylic grey primer, and preshading the joints with matt black, the upper surfaces were painted in a splinter pattern of RLM70 and 71 whilst the sides and ventral surfaces were painted in RLM65. The sides featured an extensive mottle of RLM74. Humbrol acrylic was used for the RLM65, although I now suspect this to be too blue. The remainder of paint scheme was executed with Xtraacrylix. Some issues with overspray were encountered, and more with clogging of the fast-drying acrylic in the airbrushes. I had to be ready with thinner and cottonbud to deal with overenthusiastically applied mottle, too. Once completed, the model was given a coat of Clear in preparation for the decals.
11. Markings
The kit contains Balkenkreuzer for the upper and lower wing surfaces, Hakenkreuzer for the tail, ventral Stammkennzeichen and a one-piece fuselage decal with the Balkenkreuz flanked by the Stammkennzeichen. Judging from photos of the wreck, the kit Hakenkreuz is too small, that applied seeming to be unusually large, so I replaced it with one from my trusty Microscale sheet. The kit marking is in the usual Huma grid style, from which the appropriate vertices are to be cut away, so as to conform with the German Strafgesetz 84. An ingenious idea, and ought to be made to work for that reason alone. Only not this time.
Unfortunately, I encountered quite a few problems with glue residue and silvering with the fuselage and the upper starboard decals. Pricking the film in several places and using liberal quantities of Microsol helped, but didn't entirely fix the problem. Once the decals were dry Xtraacrylix matt varnish was sprayed on to complete the finish.
12. Final Assembly
With the two halves of the nosegear fairing painted along with the rest of the model, they were married up around the nosewheel and fitted to the fuselage. The main gear legs were slotted into the fuselage, one breaking as it did so. The main wheels were glued on, and care taken to achieve the correct sit whilst the glue was still wet. The cargo ramp doors were opened up with a scalpel and the delicate ramp actuators fitted, these being painted in RLM02 and silver. The starboard crew door was opened up in a similar manner and attached with Clearfix. The airbrakes needed a little trimming before they would fit into the cavities, but fit they did.
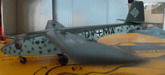
This was a pleasant little kit of a most unusual subject. I am unaware of any other kit of the Ka430, in 1/72 or any other scale.
13. References
Internet resources:
Gavin Parnaby
|
Click on
images below to see larger images
|
|
|
|