|
History:
Aw, come on!
Like there is someone here who doesn't know about He-111?!? If it
was a Soviet airplane I might even have bothered with some text but
since this was a German bomber, I shan't bother with it at all ;-)
Click on
images below to see larger images
The
kit:
Although with
Revell one can never be at ease, since they tend to fill
those pretty dark blue side opening boxes of theirs with all sorts of
antiquated plastic and newest premium plastic, you can rest assure
with this one. This is a genuine Japanese Hasegawa plastic - and at
half the price too!!! What's the logic behind it I don't know, but as long as
it'll get me a state of the art kit at half a price I'll just keep on
smiling. Since I already have their B-25 strafer in my stash, I can only
wait for them to release the B-26 Marauder and JU-88A:-)
All good
things aside, there are some details that the old 1970's Italeri kit got
better; namely the defensive armament and tail control surfaces.
Also, the ventral MG position has better side glazing with clear inserts -
helps with quicker and easier painting.
The build:
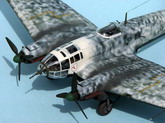
It started with the
cockpit! It was done mostly OOB with some very prominent electric cables
fashioned from stretched sprue. I should have added some seat belts from Scotch
tape since you can see some cockpit detail if you look close enough. I even
bothered with painting all those vertically stowed 250kg bombs behind the
cockpit, only to have later painted over the side windows.
Fuselage halves do
not fit 100%. I had to even the area in front of dorsal MG nest with sand paper
and use some putty under the cockpit. Also, the wings and tailplanes had to be
carefully adjusted when glued to the fuselage since they might be a bit off.
The complex
greenhouse canopy is made of 5 parts but if you don't panic and follow the
instructions all will be well. It was painted by hand and with fine
brush.
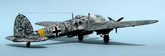
Undercarriage is
very delicate and goes together without much trouble. However the undercarriage
covers are a different story. I glued them to the wing according to instructions
only to later find out through some reference that they sat
differently. They had to be broken off and repositioned with super glue - always
check on your reference!!!
I opted to have both
options of bomb armament-just for fun. MG barrels had barrels hollowed out
and the nose cannon got a scratchbuilt sight.
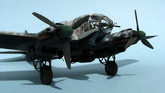
Painting:
The main
problem with He-111s is that they were mostly painted in really dull 3 colour
camo. A model of this size simply has
to be interesting. Unfortunately all options from the box weren't really
appealing and all the weird & wonderful camo was used on other He-111
models. Finally I settled on the last variant from the box but with black
undersides for a mean look for a contrast effect + some creative freedom on the
squiggle effect.
Basically, first I
painted the 2 tone bomber splinter cammo freehand (should have used some
masks after all) and after it was dry, I hit it really hard with white squiggles.
I love the effect! It looks so organic-almost like our native Marble trout skin
pattern. Unfortunately the green nose really stuck out so I had to paint it
white only to make an overkill. Now it's too late.
Since the panel
lines on this kit are rather heavily engraved I didn't apply any shade on them.
All weathering was done with dry pastels.
Although the
model might look impressive from some distance, I really have to buy a
quality airbrush together with a better compressor.
Will I do another
one? Not really. But that's not because of this wonderful kit. I just think
that there are too many WW2 German models being built every minute.
Josip
Click on
images below to see larger images
|