|
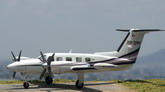
Hi. This is my Piper Cheyenne 400LS.
A what? Yeah, I know, this aircraft isn't very popular. In fact, if you'll be
lucky if you ever see one in person. There were less than 200
produced, and, this particular variant - the 400LS - has less than 40
flying in the world - mostly in Europe. .
The reason I built this bird goes
way back, to when I was a kid. Trips to the airport were frequent, since my
Father flew an early version of this aircraft. Then, I met the
Cheyenne III. Phantoms, Tomcats, Corsairs, Spitfires, you name it, you probably
fell for your favorite bird the first time you saw it. This is exactly my
case. The difference is that flying one of these is within my reach. So, I'll
explain a little about the Aircraft and the build. I hope you enjoy it, I know I
did.
Click on
images below to see larger images
The Aircraft - Piper Cheyenne (PA-42)
Back in 1967, Piper Aircraft began producing the PA-31
Navajo, a twin engine
prop used mostly as a small-scale cargo and corporate transport. The
aircraft became highly successful, and improvements came as the aircraft
matured. Among these improvements were a pressurized cabin, as well as increased
engine performance and power. When there were no more upgrades to be made in
piston power plants, the next logical step was the TurboProp.
When Piper fitted the PA-31 with PTA-28 Pratt & Whitney
engines in 1972, the PA-31T
was born, and was
named 'Cheyenne'. Originally, the engine caused more woes than benefits to
the aircraft, as the extra power caused longitudinal inestability that took
several years to fix, until 1977. The problem was fixed with two different
solutions: reduce power or tweak the airframe. Piper did both. The reduced
power version was named 'Cheyenne I' (PA-31T-1-500), while the original and
subsequent tweaked airframe versions were renamed 'Cheyenne II' (PA-31T-1-620).
The Cheyenne I and II are visually identical.
The delay with the PA-31T caused Piper to loose the lead in the twin engined GA
community, as the Beechcraft King
Air B200 became the
leader in the TurboProp class. The King Air featured an extended cabin, as well
as increased performance. In order to catch up, Piper decided not to tweak
the PA-31T again, but came up with a completely new aircraft, launched in
1979.
Introducing the Piper 'Cheyenne
III' (PA-42). Compared to
the Previous Cheyennes, the III had a T-tail and was 3 ft longer, as well as more
powerfull engines. After 88 Cheyenne IIIs were built, the 'Cheyenne
IIIA' (PA-42-720) was
launched. Again with better engines and other minor improvements done to Cheyennes
I and II. The III and the IIIA are also visually identical.
As they had done with the Navajo, the next logical step after TurboProps were
Jets. However, Piper - as well as most of General Aviation in the
1980's - was in a slump, and didn't have the resources to enter such
market. However, they noticed that the new airframe coud stand larger
imputs of power, so before they experimented with jets they decided to put a
much more powerfull engine on the Cheyenne III in 1984.
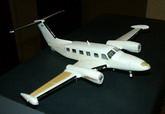
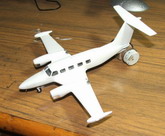
The result was the Piper 'Cheyenne IV', later renamed 'Cheyenne 400LS'
(PA-42-1000). Fitted with much more powerfull Garret TP331 engines, it is
one of the fastest TurboProps ever built. Its performance could
compete with that of small jets. The 400LS was the 'Hot Rod' of
the line, and was regarded as a 'Fire Breather'. It is distinguishable
from the III/IIIA by larger engines, propellers, and exhaust nozzle
position.
In total, the Piper Cheyenne III/IIIA/400LS was produced
until the collapse of Piper Aircraft, in 1993. Total production of the PA-42 was
of 192, including 149 III/IIIAs and 43 400s.
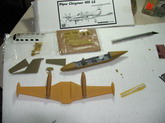
The Kit -
Gremlin Resin Kits, 1/72
I have liked this
aircraft sine I was 3, and I had always been after it, but I had found none.
Thanks to Mike Swinburne (Seiran01), I found it in Hannant's, so I ordered a
couple. The kit is made out of Resin and includes VacuForm
parts. It was the first time I worked with both, so I took my time. They turned
out to be much harder than the regular plastic kit.
The fuselage and Wings were cast in a single piece each, there were two
vacuformed fuselage tops, the tail section in a single block, and the rest of the
aircraft pieces in another.
Kit construction
started with the passenger seats, each with safety belts added made out of
Tamiya tape. The bench seat and a coat hanger were added in the back, too.
The cockpit was too simple, so I created a decal for the instrument panel and
added a leftover PE from a Hasegawa Tomcat as an Engine Control Unit.
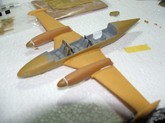
Adding the top
fuselage was very tough, and I actually had to do it twice, the first time
pieces inside the fuselage came loose so I had to bust it open. I figured it was
easier to replace the part than fixing it.
The engine nacelles
were ok, but I wanted to detail them more. I received some help from a friend,
Hugo Alcocer, regarding the exhausts. The kit's props were not for a Cheyenne
400, so I got me a couple of P-51's and stole the props from them. Also, I added
the engine Intakes to the front of the nacelle, as the kit's were non-existent.
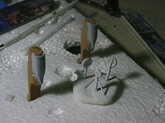
The landing gear was
built around brass tubes with styrene tubes, and the remaining pieces are thin
wire, or styrene for realism. The kit's landing gear seemed a little too
weak.
The long tail told
me the bird would be a tail sitter, which eventually was the case. However, no
matter how much weight I sanded out of the tail section, it never seemed to be
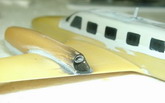
enough. So, I glued the airplane to a display base and saved some time.
The next troublesome
part was painting. Although I washed the kit previously, apparently
Tamiya White doesn't like the resin used in this kit, even with primer. I
had to decant and add a couple of drops of future in order to get the
Tamiya white to stick.
After this was
fixed, I ran into another issue: Decals. I used home printed decals
for this build, but the clear papered ones produced more trouble
than solutions - they got the colors wrong, even on white. That and a
couple of bubbles. So, I decided to strip them and retouch the aircraft.
After the decals
were stripped, I sanded the front windshield to the correct size, and
reprinted the decals. This time, on white decal paper. They turned out Okay, but
after a couple of days they also faded a bit. Bah, I can live with that.
Final panel marking
was done with a pencil, just to make them visible, but not too much.
The result? My queen
of the shelf. I like it VERY much, and I will build another one. This time a
III, which I like even more. Yet, at first, I'll enjoy this one.
Thanks for taking a peek, and Take Care!!
Mario
Click on
images below to see larger images
|
|