|
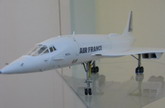
I visited Paris in 2008, and I
fell in love - with the Concorde gate guard at Charles de Gaulle. With
apologies to the Britons out there, I think the Concorde looks best in
Air France markings.
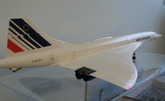
This is the Heller 1/72 Concorde.
The kit was originally released by Airfix and shipped with BA markings.
Heller provided their version, using the same mold as Airfix's, but in
Air France markings. There was some flash on the plastic, and the sprue
gates were quite thick, hence care must be taken to clean parts up before
they're used. Panel lines were recessed, but were disappointingly
thick. This is somewhat okay because I did not intend to highlight them
on this otherwise clean white jet.
In case you don't know already, a
jetliner in 1/72 is huge, and this one is no exception. It measures
33 inches in length, so you should have ample of display space if you plan on
building one.
Click on
images below to see larger images
A lot of online reviews of this
kit brought up the various shape and accuracy issues with this kit.
These problems don't bother me that much because when one builds a Concorde,
he/she builds it for the elegant and graceful lines of this iconic aircraft.
The online reviews also mentioned
the various fit problems with this kit. Boy did this kit put up a fight.
I already knew what I was getting into, but it still didn't make things much
easier. The long fuselage was divided into 3 sections, and each section
had a left and right halves. Hence if not assembled carefully, a lot of
diameter discrepancies will occur that need a lot of filling and sanding.
The dropable radome is designed to be movable, but you're better off just gluing it
in either the up or down position.
The wing root area was also
aggravating because the long seam is located right inside a recess, hence
making filling and sanding extremely difficult. For reasons unbeknownst
to me, Heller/Airfix decide to not mold the leading tip on the underside of
the wing root. It's not a manufacturing defect or "short
shot", it simply wasn't in the original mold. This problem was
rectified by rebuilding that area with plastic bits and copious amount of
putty.
The landing gears were nicely
done. They're easy to assembly and had metal inserts to provide added
strength. When installed, they're quite sturdy and I do not expect to
see sagging gears years from now.
Painting overall white on a large
airframe such as this one is challenging. I feared that I'd need to use
bottles of hobby paint and the coverage still may not be ideal. What I
decided to do was use Krylon Fusion instead of hobby paints. Krylon
Fusion is a rattle can paint designed specifically for plastic outdoor
furniture. It is cheap, cures fast, and the gloss white version is
whiter than any hobby paint in the market. You can find it in hardware
stores for just a few dollars a can.
A word of advice when using Krylon
Fusion is: DO NOT use lacquer hobby clear coat over it. Lacquer clear
coat such as Gunze Mr. Clear Coat will eat into Krylon. Don't ask me why
I know this.
After spraying the Krylon, I
applied the kit decals. These decals really were the strongest point of
the entire kit. They were thin, adhered well and the colours were
billiant. A coat of Tamiya acrylics clear was sprayed over it to seal in
the decals.
This kit wasn't a complex kit to
build. It look me a month to finish, and most of the time was spent on
sanding and filling. The end result was a stunning model. With its
sheer size, it's definitely an attention grabber when displayed. I bet
most people will admire its beautiful lines instead of complaining about its
perceived inaccuracies.
Terry
Chan
|